以前、Stellaris LaunchPadのLチカをしてみましたが、Macだと、IAR EWARMが使えません。
ネットで調べてみると、Energiaと言う物が使えるらしいので、早速試してみます。
なんか、Arduinoっぽく、簡単に書けるみたいです。
I programed Stellaris LaunchPad before. But, IAR EWARM can't be used in Mac.
I searched for a web and i found a Energia. It's like a Arduino.
1.Download the Energia
http://energia.nu/Guide_StellarisLaunchPad.html のDownloadを押します。
Press the button "Downlord" of http://energia.nu/Guide_StellarisLaunchPad.html .
OS X用dmgファイルをクリックします。
Click the energia-0101E0014-macosx.dmg .
ファイルを保存をクリック。
Click the button "Save files".
ええっ?失敗しました?
Oh, was this failed?
気を取り直して、もう一度。今度はうまく行きました。
Try again.It's OK this time.
2.Install the Energia
dmgファイルをダブルクリックして解凍し、出来上がったアプリケーションをApplicationsフォルダにドラッグします。
An application is made, when dmg file is double-clicked.And drag it icon to application folder.
アプリケーションを起動すると、以下のダイアログが出ますので、開く。を押します。
When application is started, the following dialogue is indicated.A open button is pressed.
3.Run the Energia
ありゃりゃ。Arduinoと同じ画面じゃないですか?しかも最初から日本語化されてます。
でも、CPUがmsp430になってます。
Wow. The same screen as Arduino! Moreover it's Japanese localization.
But,CPU is MSP430.
ツール -> マイコンボード -> Stellarisを選びます。
You select TOOLS , Microcomputer board, and Stellaris.
4.An allocation of IO of the Stellaris on the Energia
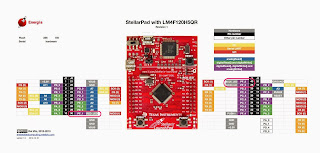
さて、IOの割当はどうなっているでしょうか?
の写真を見ると、
PF_1 RED LED
PF_2 BLUE LED
PF_3 GREEN LED
となっています。まずは、これをLチカしてみましょう。
I investigated allocation of IO.The picture existed http://energia.nu/Guide_StellarisLaunchPad.html.
The onboard LED'S allocation is,
PF_1 RED LED
PF_2 BLUE LED
PF_3 GREEN LED
I turned on these LEDs.
5.Programing and run of blinking the LEDs.
以下のスケッチを書き込み、LaunchPadをUSBに差し込んで、書き込みボタンを押します。
You write in the following program.After connecting launchPAD to Mac, a Write button is pressed.
int i; // countervoid setup(){ // put your setup code here, to run once: pinMode(PF_1, OUTPUT); // RED LED pinMode(PF_2, OUTPUT); // BLUE LED pinMode(PF_3, OUTPUT); // GREEN LED Serial.begin(115200); // Setup serial port i=0;}void loop(){ // put your main code here, to run repeatedly: digitalWrite(PF_1,HIGH); // Red delay(10); digitalWrite(PF_1,LOW); delay(10); digitalWrite(PF_2,HIGH); // Blue delay(10); digitalWrite(PF_2,LOW); delay(10); digitalWrite(PF_3,HIGH); // Green delay(10); digitalWrite(PF_3,LOW); delay(10); i++; Serial.print( int (millis())); // Print system time ms Serial.print( "," ); // , Serial.println(i); // Print counter.} |
うわっ。簡単に動きました。ここまで、マニュアルも見ないで1時間弱で完了です。
念願のシリアルモニタも使えます。
Oh,That moved easily.I didn't read a manual.I'm working for only about 1 hour.
A serial monitor can use it, too.
簡単でしょ。
It's easy, isn't it?
| Evernote はあなたがすべてを記憶し、手間をかけずに整理できるようにお手伝いします。Evernote をダウンロードする |


0 件のコメント:
コメントを投稿
コメントをどうぞ