From Evernote: |
MacBook Air に Linuxをインストールする。 その4How to install Linux in MacBook Air ,Chapter 4 |
VirtualBoxに拡張機能を追加して、もう少し便利にしてみましょう。
Let's add expanded function to VirtualBox and make it a little more convenient.
これにより、
The following functions will become effective if this work is done.
- マウスポインタの切り替えが自動になる。The change of a mouse pointer becomes automatic.
- ホストOS(OSX)との間でファイルのやり取りが出来る(共有フォルダ) The exchange of a file can be performed between host OS and guest OS.(Shared Folder)
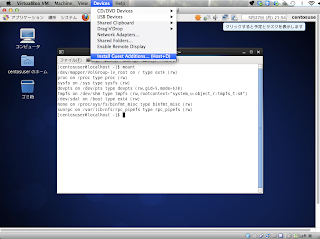
メニューバーよりDevices > Install Guest Additions を実行します。
Choose and perform "Devices > Install Guest Additions" from a menu bar.

仮想CDがドライブがセットされ、自動実行するか確認のダイアログが出てきますので、OKを押します。
Virtual CD is mounted, and A dialog is displayed [ whether it performs automatically and or not ]. Next, push the OK button.
警告のダイアログが出ます。純正のソフトウエアなので、多分、大丈夫でしょう。
と言うことで、実行する。を押します。
The dialog of warning is displayed. Because it is of genuine software, maybe, it would be okay to perform.
一般ユーザーでは実行できないプログラムの為、rootのパスワードを聞いてきます。rootのパスワードを入れ、認証する。を押します。
A general user cannot run this program,The dialog which requires an root's password is displayed. The "ninsyousuru(A)" button is pushed after putting in an root's password.
インストールが終わると、マウスポインタの統合化が完了した旨のメッセージが表示されますので、OKを押します。
After installation finishes, the message of the purport that integration of the mouse pointer was completed is displayed. And the OK button is pushed.
これで、キャプチャーキーを押さなくても、ゲストOS(Linux)とホストOS(OSX)の間で自動的にマウスポインターが切り替わるようになります。
Now, even if it does not press the "Capture" key, a mouse pointer comes to change to guest OS automatically among Hosts OS.
インストールの画面でリターンキーを押すと、画面が消えます。
Press Return to close this window.
最後に、CDを排出します。
Finally, Eject CD.
メニューバーの Devices > CD/DVD Dvices > Remove disk from virtual drive を実行すると、仮想マウントされたCDが消えます。
Choose and perform "Devices > CD/DVD Dvices > Remove disk from virtual drive" from a menu bar.Then, CD disappears from a screen.
その5では、共有フォルダを設定してみましょう。
In Chapter 5, let's set up a shared folder.


0 件のコメント:
コメントを投稿
コメントをどうぞ